Friday, December 21, 2012

Cinnamon Applesauce Ornaments

121221_CPE_cinnamon ornaments


These fragrant decorations are a wonderful sensory project to make with kids. Your home will smell delicious for days, and the finished ornaments carry the warm smell of cinnamon for years. This season, we used them as package decorations for the boys' gifts to family, friends, and teachers.

These can take several days to air-dry, but you can have finished ornaments within a day or two by using the oven or a dehydrator.

This recipe calls for glue to help make solid, long-lasting ornaments. These are not edible: Be sure your children know the dough is not safe to eat. I've tried fully edible versions, which omit the glue, but we all were frustrated with the crumbly results. If you're craving spiced cookies after this project, wash your cookie cutters and make Agave Gingerbread People!

Cinnamon Applesauce Ornaments

2 cups applesauce
2 cups ground cinnamon (feel free to work in other favorites, such as allspice, cloves, or cardamom)
1/4 cup white glue

In a bowl, stir together cinnamon, glue, and 1 1/2 cups applesauce. If dough is dry, gradually add remaining applesauce as needed to get a workable dough. If the dough ends up too wet, add more cinnamon.

Briefly knead dough on a board dusted with cinnamon. Roll out to 1/4-inch thickness. Use cookie cutters to make shapes and set on a baking sheet covered with a silicone mat, waxed paper, or foil. If you want to hang your ornaments, be sure to poke a hole at the top — a straw works nicely.

To dry: Dry in an oven set no higher than 200 degrees for a few hours, turning every so often. Remove to a wire rack and continue to air dry as needed. If you have a dehydrator, use it!

Hang dried decorations as-is, or get out the glue, glitter, and sequins and decorate as you wish. Enjoy!


Tuesday, December 18, 2012

Reindeer's Oat Cookies

 
Maybe Santa is already too full to eat more cookies, but who remembered the reindeer pack?  I bet they will be tired and very very hungry. And... with that little story I convinced the boys to get interested on mixing the ingredients and being happy about eating flax seed and some fruits and nuts they don't usually care for.
    These cookies are good not just for reindeer,  and the left overs are a great way of starting off Christmas day with a bit of something slightly healthier than sugar cookies. It's the perfect pairing for hot chocolate or a cup of nice coffee.
    The recipe is easy and you can bake them on the night before Christmas to have that wonderful smell   to attract the good cheers of the Season. Happy preparations for Santa's landing!

Reindeer Oatmeal Cookies

1/2 cup canola oil
1 cup sugar (brown or turbinado)
2 eggs
2 tablespoons flax seed meal
1 teaspoon vanilla
1 cup all purpose non-bleached flour ( I used organic White whole wheat)
1 teaspoon baking soda
1 teaspoon ground cinammon
1/2 teaspoon allspice
1/2 teaspoon ginger
1/2 cup white or dark chocolate chips or almonds (optional)
1/2 cup raisins
3 cups quick oats (uncooked)
1 - 2 tablespoons water, if needed to moist the dough

Preheat oven to 350 F. Mix oil and sugar with a whisk in a large bowl for about 2 minutes or up to when creamy. Add eggs, whisk more, then bring flax seed meal and then vanilla. In another bowl mix flour, baking soda, spices, raisins and chocolate chips or almond slices. Mix well up to when dough is forming small clutters. If too dry, sprinkle water up to when mix is gooey enough. With the help of an ice cream scooper or spoon, drop 1 tablespoon of dough on a baking sheet covered with parchment paper. Bake for about 12 minutes or up to when cookies are golden in the bottom. Cool them in a wired rack. And make sure to leave some for Santa's transportation guys !

Friday, December 14, 2012

Ice Cream Cake Winter Penguin Fest


December is the craziest month in my home. The two boys' birthdays pile up with Hannukah and Christmas and all the functions that come together for the end of the year. Normally I rush so much that the birthday cakes are not well photographed, and I never get to post about them. The same happens to my latkes, Christmas cookies, and all other festive food prepared for the season.

But this one here was different: It sounded like the easiest cake ever, so I dared to organize my bag with the camera and decorations for the cake and hope that everything would go well before putting the cakes together.

But it was one of the most challenging cakes I ever prepared, because it was a first. The result was so interesting that I decided to share it here, because I could not find a good recipe with step-by-step instructions and had to work with my own intuition.

My 5-year-old, who is turning 6 today, was adamant about having a ice cream cake, and his theme was penguins. I figured out that edible penguins could be added to the side of the cakes, and cute plastic figurines could add action to the penguin playground.

The day before assembling the cake, I baked a single layer in one the molds that became the first base for the rest. But putting it all together was not as easy as I imagined. I had some difficulties, like spreading the ice cream evenly and making sure that all would be set.

The birthday boy helped destroy cookies to make a layer of crunchy yumminess. And later, he celebrate with his friends and an avalanche of ice cream cake. Happy birthday to my creative and inspiring boy!

Ice Cream Cake
You can certainly play with flavors and shapes, and add your own touches. It's best to assemble it one day before the party, and take it out from freezer one hour before serving (depending on the weather). 

                                                        What you will need:

2 springform cake pans
4 1.5-quart tubs of ice cream (I used Breyer's  French Vanilla, Cookies and Cream, and Strawberry)
1 package vanilla-filled chocolate cookies (like Oreos)
1 package vanilla wafers (like Nilla)
1 recipe of cake, baked
1 package mini marshmallows (for hot chocolate)
1 tub whipped cream
1 package (or less) jumbo-size marshmallows
Penguin-shaped cookies and chocolates

Cover the bottoms and sides of the springform pans with parchment paper. Bake one layer of your favorite cake recipe on the bottom in each pan. On the next day, top the cooled cake with a layer of ice cream and then crumbled chocolate cookies. Cover with parchment paper and gently pound with a flat kitchen tool (I used a potato masher) to level it. Put cake in freezer for one hour, and then add the second layer of ice cream. Top with whole vanilla wafers. Repeat layers until both molds are full of ice cream and cookies.

When taking out of the pan, cover with whipped cream and marshmallows and decorate. To prevent an avalanche (like the one I had here with chocolate),  use vanilla or cream ice cream on the last layers to mix the white with the white cream so to avoid a "landslide" of chocolate ice cream.


Thursday, December 6, 2012

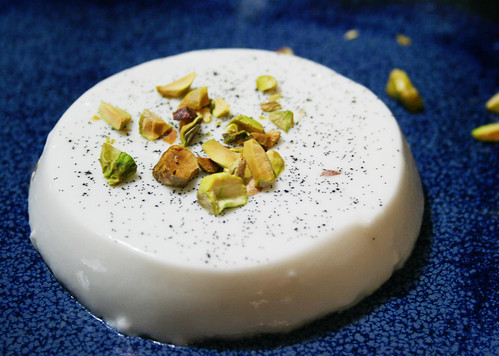
Spiced Coconut Panna Cotta

2012117_CPE_Panna Cotta


Once upon a time, having meatless friends over for dinner inspired panic: The vegans are coming! The vegans are coming! Luckily, my most frequent veggie-loving guests are flexible and appreciative of even the simplest vegetarian presentations, and I'm getting better at rising to the occasion.

Desserts still challenge me: Fruit is an elegant, straightforward finish to a meal, but the kids are inevitably disappointed. I know many of the tricks for making baked goods dairy-free, but as the daughter of an excellent baker I find myself missing the real thing.

This rich, dairy-free panna cotta, made with coconut milk and coconut cream, just might top any of the dairy versions I've had. Cardamom, allspice, vanilla, and cloves infuse it with just the right spicy kick. Best of all, you can make it well before your guests arrive.

I used coconut cream I found at Trader Joe's along with full-fat coconut milk. You can make a lighter version with a blend of regular and low-fat coconut milk, but you need some fat to keep it creamy. I love the vanilla bean speckles, but if you want a pure white panna cotta either substitute vanilla extract or keep the bean intact.

Spiced Coconut Panna Cotta

I used one 14-ounce can of coconut milk and 10 ounces of coconut cream. You can use up to 2 cups of low-fat milk with a cup of full-fat milk. This makes 6 to 8 servings. Don't feel tied down by the specific spice ingredients here — adapt types and amounts to suit your taste and what you have on hand.

3 tablespoons water
1 package gelatin
3 cups coconut milk (can use a combination of milk and cream, but don't use more than 2 cups of low-fat coconut milk)
1/2 cup sugar
1 vanilla bean, split and scraped (or substitute a splash of vanilla extract, preferably clear)
15 cardamom pods, gently cracked open
3 allspice berries
3 whole cloves
1 star anise

Sprinkle gelatin over water and let sit for 5 minutes. Warm cream over low heat and add gelatin, stirring to dissolve completely. Add sugar and cook, stirring, over medium heat, until mixture just begins to steam. Turn off the heat, add vanilla bean and spices, cover, and let sit for 20 to 30 minutes.

Lightly oil 6 to 8 ramekins. Pour mixture through a fine mesh strainer into prepared ramekins and chill at least three hours or until set.

To serve, run a knife around the inside edge of each ramekin. Turn upside-down over a plate to unmold. Serve garnished with toasted coconut, chopped pistachios, toasted sliced almonds, or a drizzle of pomegranate molasses.

Monday, December 3, 2012

13 easy DIY gifts from the kitchen kids can make

121204_CPE_DIY gifts
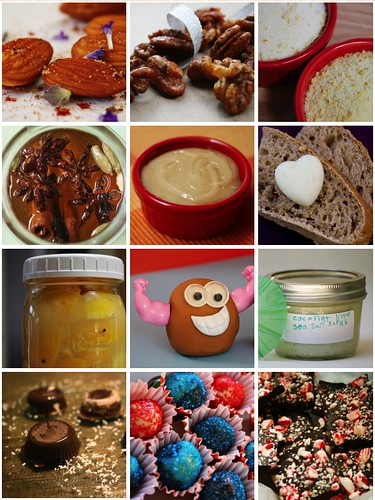
1. Smoked Paprika Almonds, 2. Spiced Nuts, 3. Citrus Salt, 4. Infused Honey, 5. Creamed Honey, 6. Butter, 7. Preserved Lemons, 8. Play Dough, 9. Coconut Lime Scrub, 10. Fleur de Sel Bon Bons, 11. Brigadeiros, 12. Peppermint Bark


We have a baker's dozen simple kitchen gifts that are kid-friendly and fun to make. Most require few ingredients and have a shelf life of at least a few weeks.

1. Roasted Almonds with Smoked Paprika and Lavender: A seductive snack for people who like a little spice in their lives.

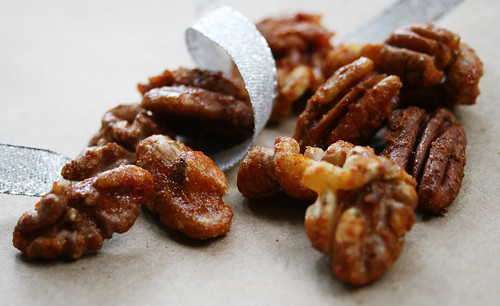
2. Best Spiced Nuts: Make a double batch. Or triple. Trust us. Garam masala and Sriracha make these addicting.

3. Citrus Salt: Put lemon, lime, and orange rinds to good use in a terrific finishing salt.

4. Infused Honey: We haven't featured this before, but it's an easy one. Add spices or very dry herbs to a jar of honey. Let it sit for a week or two, then strain and enjoy. In years past we've made vanilla, sage, lavender, lemon, and more. Pictured above is this year's batch: star anise, cinnamon, cardamom, cinnamon, and vanilla.

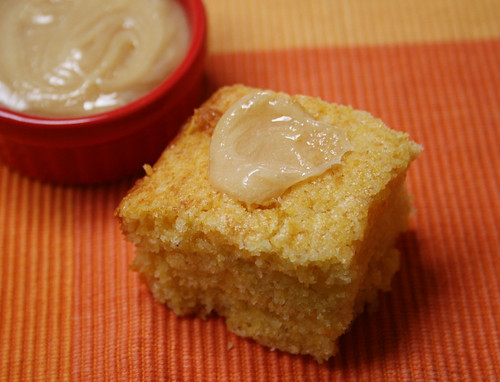
5. Creamed Honey: Liquid honey plus a dollop of creamed honey yields a big batch of homemade creamed honey. This takes a few minutes on the stove top and then two weeks' waiting time. Next year I want to try making creamed honey from infused honey...

6. Butter, Straight Up and Flavored: Start with cream, or skip ahead and blend herbs, spices, and other seasonings into softened butter. Pack into molds or roll up into a log for a creative gift.

7. Preserved Lemons: This takes a few weeks, but it's mostly waiting-around-time. Be sure to include some tips on how to use this tasty condiment.

8. Perfect Play Dough: What better gift to give young friends? Make any color you fancy, mix in a little sparkly glitter, add scents — a wonderful gift to personalize.

9. Coconut Lime Sea Salt Scrub: A fun sensory project to make, and a big hit with our teachers last year.

10. Fleur de Sel Bon Bons: This is a little messier than the other projects, but if you're up for it you and the kids will have a blast playing chocolatier in your kitchen.

11. Brigadeiros: Another slightly messy one, but messy stuff is usually the most fun. These delectable little candies disappear at parties — give a tray in little paper cups.

12. Peppermint Bark: A holiday classic, simple and delightful. Easy to make huge batches.

13. Vanilla Sugar: A super-simple bonus! Stick a vanilla bean in a jar of sugar. Done. It takes a few weeks for the flavor to infuse, but it lasts forever. It's a great way to extend the life of scraped pods too. (I get a pound of vanilla beans each year — that's about 100 — for $20 to $30 from this site.)

What are you making for gifts this year? We'd love to hear!

Monday, November 26, 2012

Liquid Pumpkin Pie


If you are still inspired to make pumpkin-based food, here's a little recipe tested many times at school. The reviews were very diverse but surely all children from our Cooking Club enjoyed making a very different version of a pumpkin pie, to celebrate Thanksgiving season.

The whole experience was exciting: First some kids were not very happy to smell both pumpkin and butternut squash, but were very enthusiastic when they saw the other ingredients. It was unanimous that  most of them loved sugar, graham crackers, and condensed milk. Uncertainty was present when asked about coconut milk and coconut flakes. Curiosity, though, was also there, and even if some kids refused to go further after a first spoonful, they at least had tried something different.

Smashing the pumpkins, punching the bags with graham crackers and using the dangerous-looking hand blender were the high points of the class. After the experience, the teacher asked the kids what they thought about the recipe, gathering some adjectives on the board. As you can see, it was a wonderful way of understanding that, after all, it's all a matter of taste.


Liquid Pumpkin Pie

I will soon freeze a batch in an ice cream machine to test the outcome. Probably it will be sweet enough to be in our repertoire for next Thanksgiving!

1 cup mashed sweet pumpkin (can be organic from a can)
1 cup freshly baked or cooked butternut squash
2 cups coconut milk
1 teaspoon pumpkin pie spice
4 tablespoons sugar (preferrably brown, but kids preferred white sugar)
Condensed milk, to garnish
Toasted coconut curls or grated coconut to garnish
3 graham crackers, broken into small pieces in a plastic bag

Place pumpkin and butternut squash chunks on plates and mash with a fork. In a bowl, combine mashed pumpkin and butternut squash with coconut milk and set aside. Punch the bag full of graham cracker to transform them into cookie crumbles.

Mix everything together with a blender until smooth. Serve in bowls topped with graham cracker crumbles, a swirl of condensed milk, and coconut to add texture and interest to the soup. Enjoy cold. 

Sunday, November 18, 2012

A Thanksgiving feast

As a food blog, we should be bursting with plans for the Thanksgiving meal. But we've been a little quiet, because we aren't preparing big feasts this year. My family goes out for the holiday meal — and I'm grateful to enjoy the fruits of someone else's labor!

But if I were cooking, this is the meal I would plan:

20101209_spiced nuts_1

Best Spiced Nuts: Slightly sweet with a kick from garam masala and Sriracha — irresistible snacking while you wait for the turkey to be done.

Dry-Cured Rosemary Turkey: This is the sole entry here that isn't from this site. This was my go-to holiday recipe for years. The blend of seasonings is just fantastic. Get started on it right away: It cures in the fridge for three days before cooking.

Chestnut Sage Soup: I dream about this soup. Creamy chestnut puree with apples, sage, bacon, and vanilla notes... swoon.


Succotash in Squash: This is a showstopper vegetarian dish, scoring huge points for flavor, presentation, and history — a nod to Native Americans and Thanksgiving tradition.

Yams with Za'atar: Give the candied yams a rest. Instead of burying veggies in sweetness, bring out their deep flavor with za'atar spice. This dish is a cinch to make, which is a blessing on a busy cooking day.

Crunchy Marinated Green Beans: Instead of burying green beans in a casserole, show them off with a touch of Asian flavors.

Black-Eyed Peas Salad: With canned beans, this takes almost no effort. And you can make it the night before, so it's one less thing to tackle on Thanksgiving Day.

Rice of Many Colors: This kid-friendly dish is packed with protein and veggies, and easily adaptable to suit your family's taste.


Minute Bread: Tasty rolls with cheese baked right in — delicious!

Pumpkin Pudding with Cranberry Sauce: An unusual dessert that takes full advantage of fresh cranberries.

Pear and Cranberry Sauce Skillet Pie: This twist on a typical pie blends sweet and tart flavors for a perfect finish to the meal.

Thursday, November 15, 2012

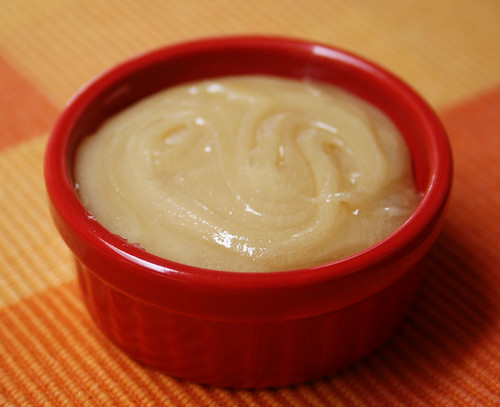
Creamed honey

201211_CPE-creamed-honey1


My 8-year-old and I just whipped up his holiday gifts for friends, family, and teachers: homemade creamed honey! We had no idea how easy it is to make such a delicious spread. And it's a fascinating project for curious little scientists.
You've probably had a jar of liquid honey become crystallized. Creamed honey is also crystallized, but it's a controlled process with much finer crystals. Naturally crystallized honey tastes gritty and rough. Creamed honey, on the other hand, is smooth like soft butter.

To make it, you need a bit of creamed honey as starter, or seed. By stirring it into liquid honey, you're providing a crystal pattern for the liquid honey to replicate. If you stirred in large, chunky crystallized honey, the liquid honey would replicate those crystals. The tiny little crystals in the creamed honey beget more tiny little crystals in the liquid honey, and within a few weeks you have a new jar of deliciously smooth, spreadable honey.

Once you have a batch of creamed honey, you can maintain an endless supply by using it as the seed crystals for each successive batch.

It takes about two weeks for creamed honey to crystallize. While the kids watch and wait, they might want to learn more about crystals. This would be a great springboard for learning about snowflakes, making crystals, or even making rock candy or fudge. You could also try other projects that use starter, like sourdough bread or homemade yogurt.

By the way, if your liquid honey naturally crystallizes, it hasn't gone bad. To salvage it, heat the bottle gently in a pan of warm water to dissolve the crystals. Your honey should be good as new.

201211_CPE-creamed-honey2


Creamed Honey

You can easily scale this recipe up or down. Just be sure you have at least one part creamed honey per 10 parts regular honey. You can use a higher proportion of creamed honey, if you wish, but don't go any lower. Regular creamed honey from the market works fine — if you can get some from a local beekeeper, even better!
1 cup honey
2 tablespoons creamed honey

In a small saucepan, warm the cup of honey over medium-low heat, stirring occasionally, until it reaches 140 degrees. Remove from heat and let cool to room temperature. This step is important: It dissolves any crystals that may already have begun to form in the honey.

Once the liquid honey is cool, add the creamed honey and mix thoroughly, stirring for several minutes. Let the mixture sit, covered, overnight to allow air bubbles to rise to the top.

Spoon the blended honey into a jar and let it sit. The process takes about two to three weeks at room temperature, less in the refrigerator. The honey will gradually turn light in color and develop a creamy texture. There's no need to refrigerate the finished project — honey will keep indefinitely at room temperature.

Thursday, November 1, 2012

Halloween candy: 4 ways to find it a new home

Our kids came home with 108 pieces of candy in one bucket and 82 in another. This was the final count after we picked out and removed candies that are not popular around here: artificially flavored and artificially colored ones, those hard to brush off teeth, and hard candy with no nutritional value other than sugar and colors. We "recycled" some and put in our door basket, so that older kids who arrived later would enjoy them.

In Darienne's home, the candy haul was smaller. Her kids love greeting trick-or-treaters, so they visited fewer homes before heading home to welcome older kids making late rounds. She lets her boys plow through the candy, then it's done and gone. Sometimes the kids eat way too much at once, and they realize what it means to have too much of a good thing. They gorge on candy for a few days, but then it's out of the house and the kids seem none the worse for it.

If you're looking for ways to use up excess Halloween candy, here are a few more ideas:

Send them to the troops: This organization organizes buyback events for dentists. Candy is exchanged for all sort of prizes, and then is sent to Operation Gratitude.

Play with math: Use leftover candy in an Advent calendar.

Create a crazy recipe: Make up something like this Peanut Butter and Toffee Candy Barka fancy sweet terrine, or a wacky cake.

Use them as decorations: Craft a Thanksgiving tree centerpiece or decorate sugar cookies.


Tuesday, October 30, 2012

Spider Cupcakes


Happy Halloween!
Those spook-tacular spider cakes are our favorite treat this year. They are dairy-free, egg-free, and very delicious. Kids had a great time decorating them and making their own versions of spiders, with different choices of colors and ingredients.

I found this recipe for the cupcake a couple years ago, when confronted with the many food allergies at school, and I tested it many times. It can be found here at one of my favorite DIY websites:

Best Chocolate Cake Ever (and it happens to be vegan) 

It's amazing and its light texture is ideally what we want for a cupcake. Also I've been working on ideas for healthier cake decorations and frosting ideas for years, and this was a great opportunity to use some of them.

The decorations were our choices of natural-colored candies and fruit leather, and, as you can see in this wonderful retro-like photo, taken by Darienne, even some cereal and white chocolate. That means they're still attractive and edible after the eyes and spider legs are devoured by our little monsters.

If you want to trick your friends and kids with a vegan alternative that tastes as good as a regular one, this is your treat to try!  Enjoy.


Healthy Spider Decorations
Trader Joe's and Whole Foods carry lots of no-artificial colors candies that can be used here. Our choice for fruit leather was TJ's boysenberry, but any other will work.
6 fruit leather bars
1 cup cereal (Cheerios, Joe's O's)
1 box coated sunflower seeds (these have a bit of milk chocolate, so they should be avoided if choosing a strictly vegan cupcake) or tiny pieces of strawberry for fangs and dry rasperry bits for eyes
white chocolate chips
children's scissors

Invite kids to cut the legs and create their own spider face with the decorations. Use the chocolate glaze printed with the original recipe like a glue, while it's still warm. Let cakes dry a bit (if you have time), and serve them on a web of treats...

Wednesday, October 24, 2012

1 1/2 Apples Pancakes


While it's all about the omnipresent pumpkin, this month and beyond, we were also thinking about one precious gift from the season: Apples.
We tested this recipe with kindergartners of our first session of the Cooking Club at school, and it was a hit. Not just because they were having fun chopping apples and mixing ingredients, but also because they just loved the book that went along with the recipe: Amelia Bedelia's First Apple Pie, by Herman Parish, illustrated by Lynne Avril. The cute story also brings a recipe, but we had to decide for something simpler and faster, something almost like a pancake. Like this book suggests, it's always important to be flexible, and kids were happy enough to try something different, but also something they made. Just like the hilarious and sweet Amelia Bedelia!


Apple Quick Cakes
This recipe was adapted from the New York Times recipe, Apple Griddle Cakes. I mostly substituted some ingredients to make it possible for all kids to taste it. It became vegan, and also safe for kids allergic to eggs and dairy.

1 cup white whole wheat flour
3 tablespoons brown sugar
2 teaspoons baking powder
3/4 cups vanilla soy milk
2 tablespoons canola oil
1 tablespoon flax seed meal mixed with 3 tablespoons water
1 granny smith apple, diced in small pieces
1/2 Gala,  Fuji or Gravenstein apple, also cut in to small pieces
Cinnamon (optional)
Powdered sugar, for dusting

Heat a electric griddle, or skillet, to medium heat (350 F). In a large bowl mix dry ingredients, and whisk to mix them all. Add pieces of apple to coat them with mix. In another bowl mix wet ingredients and whisk. Pour the wet mix on the dry ingredients bowl.  Stir with a wooden spatula up to when is mixed. Batter should be thick, enough to be scooped to the griddle. Brush or spray vegetable oil to the hot surface and scoop batter. Flip after about 3 minutes or when surface is already showing signs of becoming golden. Allow other 3 minutes for the other side. Enjoy with powdered sugar, maple syrup or vanilla ice cream on top. 

Monday, October 22, 2012

3 ways to enjoy pumpkin for dinner

We're surrounded by sweet pumpkin treats this season — store shelves seem to get a little crazier every year. Take a break from pumpkin pie and try making pumpkin part of the main event with these vegetarian recipes for pumpkin chili, tortillas, and tostadas.

Pumpkin Chipotle Chili

We dished this up for a Halloween party a few years back — my only photo of it is squashed with shots of other treats at the party, so you get the whole thing. But it was the chili that has been repeated year after year... It calls for roasting a pumpkin rather than opening a can, which is hardly any work at all. Your home will smell delicious. Trust me.

Halloween09 mosaic


Pumpkin Tostadas with Black Beans

This one was a flop with the kids, I confess. My kids aren't eating beans, cheese, vegetables, tortillas, or sauces these days, so it isn't a big surprise. Some day, however, they'll realize what they're missing. This fast meal can be made with canned pumpkin and beans and jarred salsa — or you can prep it all from scratch. Your choice. If you're feeling really fancy, add in some fried sage leaves. Yum.


Pumpkin Tortillas

I usually buy tortillas at the store. Every time I do, I wish I had taken the minimal time to make tortillas from scratch. It really isn't that difficult, but it's hard to pull it together on a week night. These gorgeous,  saffron-hued tortillas last a week in the refrigerator, or even longer in the freezer. Use them to give everyday quesadillas a flavorful boost, or use them to add depth to the Pumpkin Tostadas above.

Sunday, October 14, 2012

4 fast and sweet treats for Halloween


These treats take mere seconds to make and are easy projects for children — or busy parents looking to slip something fun into a lunch box. Added bonus: All but one involve healthy, whole foods.


Lunch Box Pumpkins

Clementine + Sharpie permanent marker = super fun fruit in seconds! Pile 'em up on a plate and you have a pumpkin patch centerpiece.


Spooky Bananas

Gently scratch writing on a banana peel. At first it's invisible ... but the writing gradually appears over the next hour. (This one's courtesy of Cute Food for Kids.)


Marshmallow Ghosts

These require slightly more specialized equipment: edible markers, such as Food Writer pens from Wilton. Just draw a spooky face on a marshmallow. Boo!


Eyeball & Ghost Eggs

You can use a Sharpie or an edible marker for these. Aren't they gruesome?!

Monday, October 8, 2012

3 perfect pumpkin treats

This is one of our favorite times of year. Predictably, as the days grow cooler and shorter we find ourselves drawn to pumpkin ... but not always in predictable ways. Here are three sweetly surprising ways to enjoy pumpkin:


Pumpkin Coconut Scones

Coconut adds a Brazilian note to these hearty, spice-infused scones made with a blend of white and whole wheat flour. What a beautiful way to start a fall morning!


Whipped Pumpkin Cream Cheese

I swear people stalk the refrigerated shelves at my local Trader Joe's, snapping up the seasonal pumpkin cream cheese as soon as it's stocked. I kept finding myself disappointed and out of luck — so I worked up this homemade version. It's a less expensive, a little lighter, and I can have as much as I want whenever I want it.


Pumpkin Pudding

Cranberry makes another appearance here — this time, at the center of a unique, velvety pumpkin pudding. Let it set in a beautiful mold and you'll have a standout dessert for a Halloween party or seasonal table.


Thursday, October 4, 2012

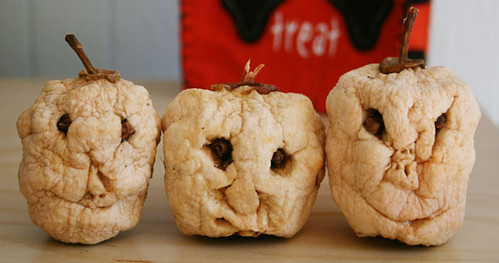
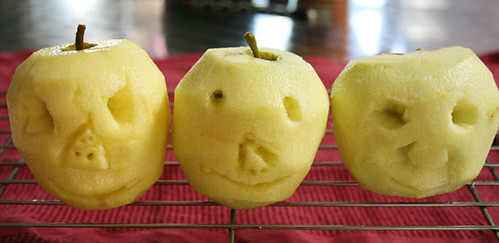
Shrunken heads

121002_CPE_shrunken-heads_1


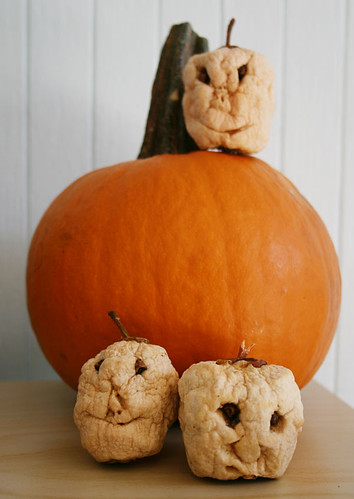
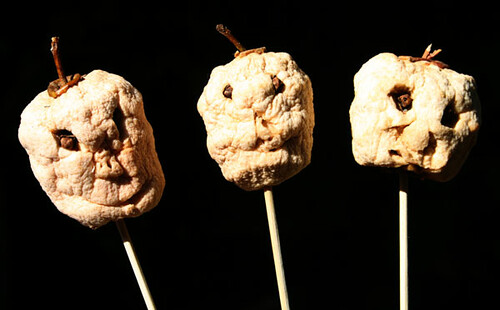
I think we called these apple dolls when I was little, but shrunken heads is so much more appropriate, don't you think? We've had these ghoulish heads impaled on stakes in a flowerpot on our counter for the past two weeks. I rather like them this way, but the kids want to give them mummified bodies.

The finished apples are leathery, soft enough that you can use a needle and thread to sew in a hanger. When I was a girl, we fashioned hangers out of paper clips and stuck those in when we carved the apples. If you remove the core, you can stick the dried apple atop a bottle, then decorate the bottle as a body. Or you could just leave them impaled on sticks — you know, as a warning to the other apples.

120919_CPE-apples-before
The before picture

These are so easy and fun to create with kids, and they make perfect Halloween decorations. We used pointy pencils to scratch out the features, then I carved them with a small jackknife. The kids checked them daily, checking out how the texture changed as the moisture evaporated.

Apple heads can take as long as three weeks to dry, so don't wait until the last minute! I hear they can last for years, but I can't personally vouch for that — yet.

When they're done, you can even sew or glue on yarn for hair and decorate them however you wish.

121002_CPE_shrunken-heads_2


Shrunken heads

apples
1/2 cup lemon juice
1/4 cup salt
2 to 3 cups water

Combine lemon juice, salt, and water in a bowl and set aside.

To make each head, first peel the apple (no need to remove the core, unless you want to fit the finished apple on a bottle) and soak it in the bowl of lemony salt water for a minute or so.

Draw features on the apple with a pointy tool — a toothpick, a small skewer, a paring knife. Kids can use a pointy pencil. Then use a paring knife or other small tool to carve out the features. Remember: It will shrink, so keep it simple and don't fuss over details. If you like, insert whole cloves into the eyes or dried rice as teeth.

Soak the carved apple in the lemony salt water and soak for a few minutes. Remove it, pat it dry, and decide how you're going to let it dry. You can set it on a wire rack, stick it on a skewer, fashion a paper clip hanger — just don't set it on a plate or it will get moldy fast. It will take one to three weeks for your apple head to dry.

To kick-start the process, put your freshly cut apple in the oven at a low temperature — no more than 175 degrees — for an hour or two.

Keep an eye on your apple: If mold starts to form, gently scrape it away. You also can spritz it with a weak bleach solution.

121002_CPE_shrunken-heads_3

Friday, September 28, 2012

Cereal Energy Shake

       
Yes, after all these years writing about attempts to raise brave, adventurous and healthy kids I have a confession: My 7-year-old is currently and frequently too busy to eat. I had to call an emergency plan to make sure he's getting enough fuel for his daily jumping and running.

I am sure his calorie expenditure is high: When not sitting in the classroom, the boy is, most of the time, in action, and seems to have endless energy. What I am also sure of is that some days he is extremely distracted, not interested in food of any color or shape, and his lunchbox comes home still full of food from the school.
       
For those days, when he is not in the mood to eat his whole bowl of cereal, drink his milk, eat the recommended fruit portion for his age, and "no way Mom" he's not going to eat almonds,  I just use my new Waring blender and pack as much nutrition in a cup as I can.

After testing some ready-made shakes to help with kids who don't want to eat, I made our own. It's not gourmet, and far from trendy, but it works. It seems like after drinking the cereal drink in the morning, his day goes smoother, and he's less cranky and has more appetite. Cheers!

Cereal  Energy Shake

I am still testing other mixes that may include almond butter or peanut butter.

7 ounces cold coconut milk (from cartons, or soy, or regular milk)
1/2 frozen banana
1/2 cup fortified oat-based cereal (or any cereal in your cabinet)
2 tablespoons slivered almonds
2 tsp cocoa (optional )
Pinch of cinnamon (optional)

Mix all ingredients in a blender on high speed until smooth and mixed well,  and serve immediately in an attractive tall cup. 

Thursday, September 20, 2012

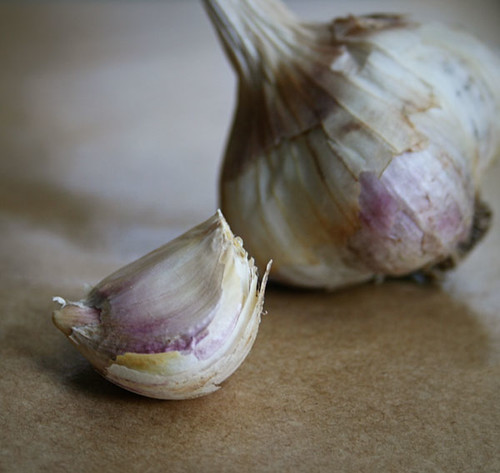
Homegrown garlic

12_CPE_garlic2


It’s almost time to plant garlic! Even if you aren’t much of a gardener — even if you don’t have a garden — you should stick some garlic cloves in dirt. It takes almost no effort and the potential rewards are gratifying.

To me, it’s a meditative pleasure to begin so many meals with aromatic garlic grown just steps away from my kitchen. Even if dinner is just spaghetti tossed with garlic and olive oil, that homegrown garlic makes it mine.

Growing garlic is simple and satisfying for kids too: Those bulbs under the ground are a promise of spring’s bounty.

Tuck some cloves into the ground this fall and by next summer you'll be cooking with your own freshly harvested garlic. Enjoy the spring garlic and scapes, but be sure to leave plenty to harvest later so you can enjoy them well into winter.

Like most things, there's an easy way and a hard way. The easiest way: Separate some nice, big cloves from an ordinary garlic bulb from your market. Poke them an inch or two into the ground, pointy end up, and keep them 4 to 6 inches apart. Cover with some mulch, such as fall leaves, and ignore until spring.

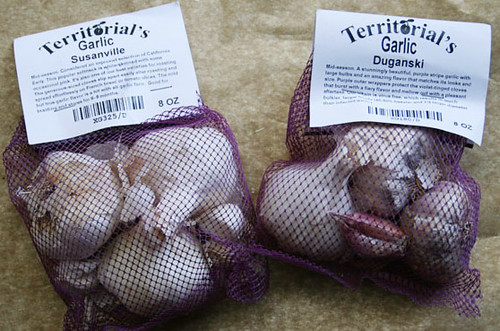
That’s pretty much what I do, though I do order bulbs so I can be sure exactly what I’m planting. It's good to know whether you’re planting hardneck or softneck garlic. Hardneck garlic is generally better for colder climates and provides the added bonus of garlic scapes in spring. Softneck garlic typically lasts longer in storage and can be woven into a pretty braid. (I’m planting both.)

If you’re really fussy, you can inoculate the cloves before planting and fertilize in the spring ... I don’t bother. They seem to do fine in their own, even in the heavy clay soil here.

In early summer I watch for leaves turning brown. When just a few green leaves are left, I gently dig the bulbs out of the dirt, carefully shake off as much soil as I can, and set them on newspaper in a single layer, out of the sun, so they can cure for storage.

After a few days, you might want to brush more dirt off the drying bulbs. Be careful not to bruise them. I was overly aggressive last year and damaged quite a few, so this year I skipped this extra cleaning. My bulbs look a little grubby, but they taste great.

120920_CPE_garlic1


I aim for planting my garlic the first two weeks of October or so, but you should check advice specific to your part of the world.

For more detailed guidance, try these simple tips from the Daily Green. Apartment Therapy offers a primer on growing garlic in a container.

If you want to order bulbs for planting, do it now! I like Territorial Seed Company (I ordered their softneck/hardneck combo) and John Scheepers Kitchen Garden Seeds.

LinkWithin

Related Posts Plugin for WordPress, Blogger...